How to Build Stone Stoves and Outdoor Survival Ovens
Welcome! This article contains affiliate links, meaning I get a commission if you decide to make a purchase through my links, at no extra cost to you.
Tripods and a kettle on an open campfire sound like a great way of outdoor cooking, but a stone stove or outdoor survival oven is a much better way to go.
Gusts of wind that might blow smoke and sparks all over the place won’t bother you anymore, and heat stays where it is needed. Stone stoves and outdoor survival ovens beat an open campfire, no matter how well built and maintained, every time.
I love preserving old knowledge, and this article is no exception. It is based on Harper’s Outdoor Book for Boys by Joseph Adams, which is freely available at the Gutenberg Project. This is my ‘modern’ rewrite of it, with original pictures.
Whether you’re preparing for whatever may come your way, or specifically looking for a great weekend outdoor backyard project, these outdoor cooking stoves and ovens are worth looking at.
Read on below and discover which stone stoves and outdoor survival ovens are best for you and your outdoor cooking needs!
Table of contents
How to Build Stone Stoves
Stone stoves are a much better option for cooking fires, as shown in fig. 32. With most stone ovens, the fire stays in the stone enclosure and the majority of the heat remains in the center, right underneath your pot.
- To make this stove, start by collecting flat stones and some clay if you can get it. Clay is often found in the bed of creeks and dry river beds and can be used to seal the joints of your stone stove.
- Sealing the joints will make your fire burn better, as the only entry for draught is the draught-hole (the doorway at the base of the stove), which is also where you feed sticks into the fire.
- Make a draught hole on 2 or 3 sides of your stone stove. You can use just one, and close off the other holes to suit the direction of the wind.
- Hang the pot on the center pole so it touches the top of the stove and holds the heat. You can also use a pan on top of the stove for frying fish or meat, and in a pinch for smoking meat while camping.
You can make this stone stove either round or square. If you have bricks available, they’re easier to use than stones because they’re simpler to stack nearly without big gaps.
The center pole (or ridge pole) should be supported by 2 sticks in a tripod (or two-pod) on one end, and a yoked stick on the other end. Embed the yoked stick into the ground for at least a foot, so you can remove the center pole without the whole thing collapsing.
Always build your campfire or stove in the shade; it won’t burn well in the sun. If it rains, you can put a canopy over the stone stove to keep it dry.
How to Build a Trench Cooking Fire
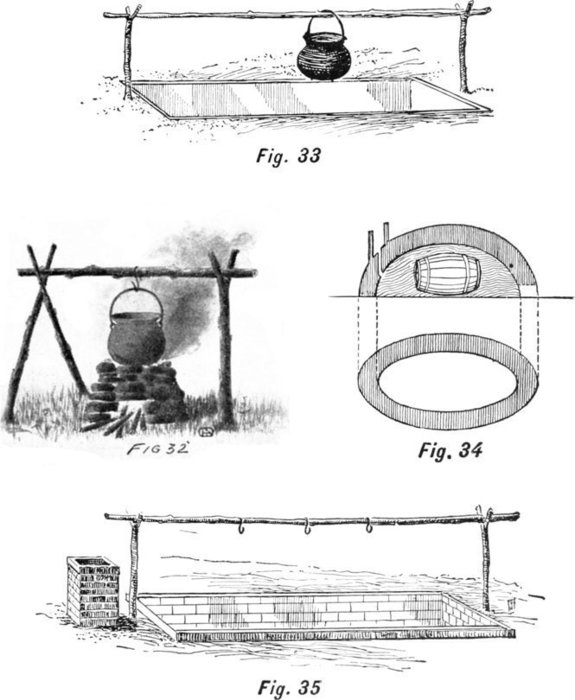
Onto figure 33, which is another setup suitable for using for a few weeks whether in the backcountry of the national park or in your backyard.
The trench cooking fire is a great idea to build with the kids and enjoy your favorite grills and roast chestnuts on for the summer holidays, or camp around in the backyard!
Dig a trench with square sides, 18 inches wide, a foot deep, and as long as the distance between your upright poles. Make the fire in the hole, on the ground.
The wind won’t bother you half as much as a normal campfire above ground, so long as you set your trench up decently.
If you have the gear and want to go a step further, have a closer look at figure 35. The trench cooking fire involves walling up the sides of the trench with bricks and building a small chimney at one end.
Metal ‘s’ hooks can be used to hang kettles on your center pole as well, making it even more convenient.
How to Build a Hillside Stove/Outdoor Survival Oven
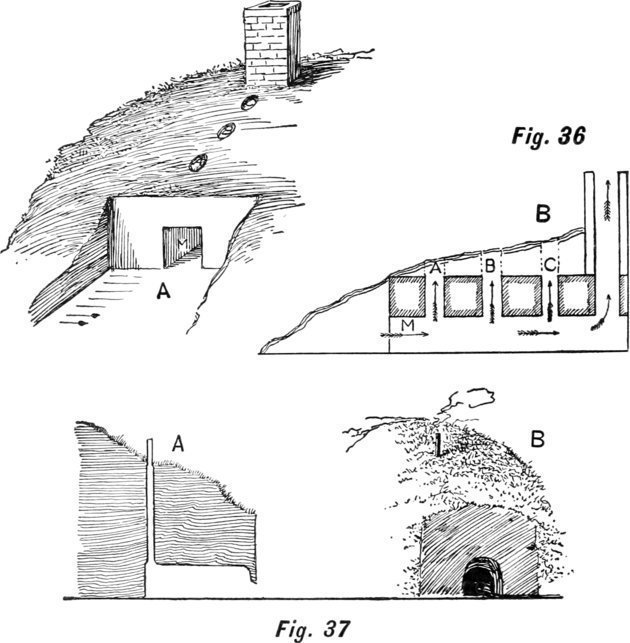
Figure 36 shows us an outdoor kitchen that the army used to use for camp cooking, and it’s a great outdoor kitchen for all-around stuff.
You can use this design for heating water/making coffee as well as cooking/baking most camp food. Outdoor survival ovens are also utilized for heat and as a central gathering place for engaging in fun and games around the camp.
A decent outdoor survival oven does take a fair bit more time to build than the other DIY stoves above, but it is well worth it, for the cooking and novelty factor.
Start constructing your outdoor survival oven by digging a hole, about 3 feet square and 2 feet deep. It’s best to dig into the side of a hill, if possible.
The next couple of steps seem more complicated than they really are. We suggest reading over them a couple of times in a row and having an additional look at the graphics.
Continue by running a lateral shaft on one side, approximately 1-foot square and 6 feet long, 1 foot from the surface of the ground.
At the extreme end, sink a shaft vertically and form a chimney, and pierce holes at equal distances.
Make the holes the right size so kettles don’t slip through. Like this, the kettles can be placed over the fire to boil, or on the side to simmer.

How to Build an Outdoor Bread Oven
I want to tell the young camper how to bake his own bread in camp, so if he camps far from a store or house where he can buy his bread he will not have to eat crackers, or those indigestion-producers, flapjacks, that the youthful camper knows how to make, or thinks he does.
Joseph Adams
We’ll refer to figure 37 now:
A bank from 4 to 6 feet is the best for this outdoor bread oven type stone stove.
Start by digging down the bank to a vertical face and excavate a hole at the base of 3 to 4 feet horizontally.
Make sure you keep the entrance to your bread oven as small as possible.
Hollow out the sides and arch the roof next. Work them until the floor of the oven is about 2 feet wide, and the arch is about 16 inches at its center.
Now, carefully “tap” the back end for a chimney, and put a piece of stove pipe in it if you have it. Aim for a hole that measures 4 to 6 inches wide.
Make sure to wet the inside and smooth over the walls. That way the mud hardens properly. Leave it to dry for a day.
When you’re ready to bake bread in the oven, build a good fire in it, and remove the fire when it is nice and hot. Scrape the ashes out and put the pans of dough inside.
Close the entry with a board and cover it with mud so you keep all the heat in. If you look after this oven, it’ll last you several weeks!

DIY Oven Without a Bank
In the case you don’t have a bank to build the bread oven in, you can build a good oven on level ground also. I’ve put the same illustration on here again because we’ll refer to figure 34 this time.
If you have a barrel, use it. If you don’t have a barrel, use twigs of willow stuck into the ground and bent over to form a mold.
Over the barrel or willow mold, plaster a stiff mortar made of mud, starting at the base.
Fair warning: building stone stoves like these requires a bit of patience, if not practice.
Lay the mortar onto the barrel, applying it onto the surface about 6 inches thick. Leave the barrel and plaster to dry for one to two days before moving on.
Once the barrel/mortar are nearly dry, cut a door at one end and a flue on the other end.
If you don’t have a piece of stove pipe handy, you can build a small mud chimney to increase draught. In the case you used a barrel for creating your mold, you can burn it out without hurting your oven.
Lastly, remove all the dirt and keep up a fire for at least half a day before baking. The next step is actually using this nifty stone stove for baking bread or making campfire pizza!

FAQs About Stone Stoves and Outdoor Survival Ovens
Building a rock stove is similar to, and sometimes is one and the same thing, as making a stone stove or outdoor survival oven. The most basic rock stove is built by leaning two semi-large rocks together, on top of a flat stone or another hard surface. The fire is built inside of the small hole created by the two to three rocks.
The main difference between a basic rock stove and a stone stove is that rock stoves are often more primitive, and much smaller. Further, rock stove designs typically allow just enough room for a small fire for warmth, heating, and minimal cooking. Stone stoves and outdoor survival ovens, on the other hand, are normally designed for greater functionality, including cooking, heating, and as a social point.
The list of simple stoves you can build while camping is a long one. Some of the best options include stone stoves and rock stones, including trench, pit, mound, hillside types, and more. Building an outdoor survival oven is also a great alternative for your cooking and heating needs during camping trips.
A Final Word About Building Stone Stoves and Outdoor Survival Ovens
Building a stone stove or outdoor survival oven is almost always the best choice. Especially in comparison to an open fire and a kettle, or backpacking a heavy cooking stove to your camping site.
Building stone stoves or outdoor survival ovens is a far better solution.
Hopefully, with all of the choices listed above, you can now decide which stove or oven is best for you. Just remember to keep all of your outdoor cooking styles/needs in mind when you do so!
From stone stoves for use with a cooking pot to trench-style cooking stoves and outdoor survival ovens to bread ovens. You have plenty of options to choose from for your next backyard cooking session or camping trip!
If you’ve built a stone stove/outdoor oven in your backyard or while camping, I’d love to hear about it.
Let us know all about it in the comments section, and don’t be shy with your photos either!
Keep reading:

Fill your garden with fresh vegetables and your kitchen with homegrown food. This heirloom seed collection includes 32 popular varieties, from tomatoes, cucumbers, and lettuce to pumpkins, corn, beans, and carrots. It's an easy way to start a productive vegetable garden, grow more of your own food, and enjoy harvests that taste far better than store-bought produce. Perfect for anyone dreaming of a backyard packed with fresh vegetables!


What’s worked for you?
Have something to add? Share your experience below. Whether you’ve been gardening, raising animals, or making things yourself for years, your tips might help someone else.