
How To Preserve Garden Herbs – 9 Proven Methods For Long-Term Culinary Use!
Welcome! This article contains affiliate links, meaning I get a commission if you decide to make a purchase through my links, at no extra cost to you.
You’ve babied your herbs all season long. And now your garden is bursting with more fragrant goodness than you can use in a month. Don’t let those hard-earned herbs go limp in the fridge! Instead, try these nine innovative ways to preserve your herbs for long-term use. They’re perfect for drying, freezing, or infusing. Each method also locks in flavor. So your cooking remains garden-fresh long after the harvest has faded.
Sound intriguing?
Then, let’s preserve some herbs!
9 Best Ways To Preserve Garden Herbs For Long-Term Culinary Use!
From ancient air-drying techniques to modern freezer hacks, here’s your complete toolkit for turning fleeting herbs into lasting flavor.
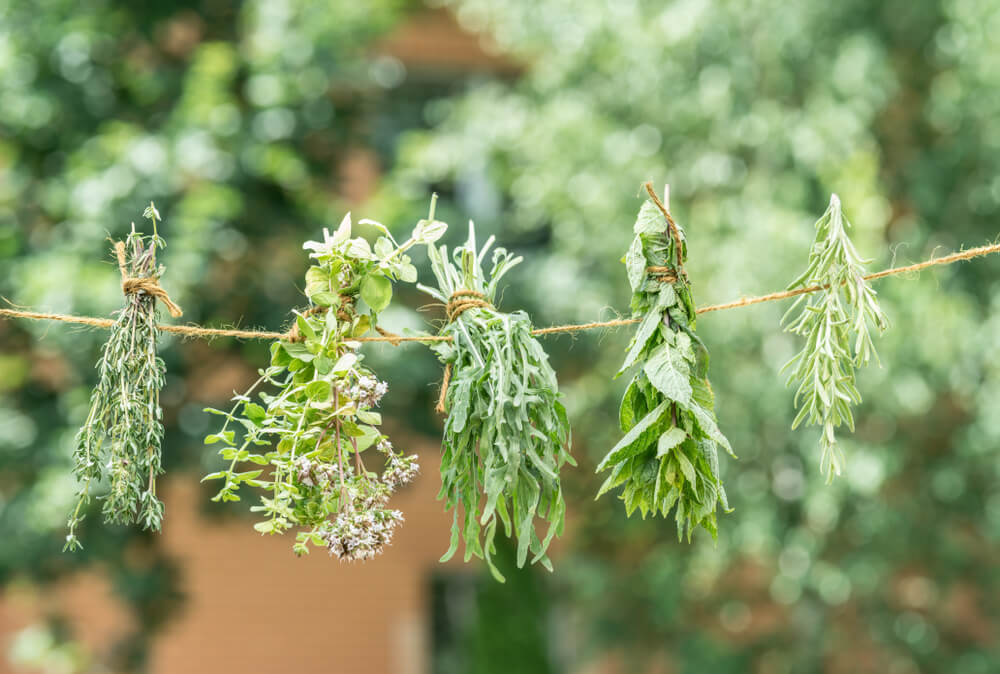
1. Air Drying – The Classic Witch Vibes Method
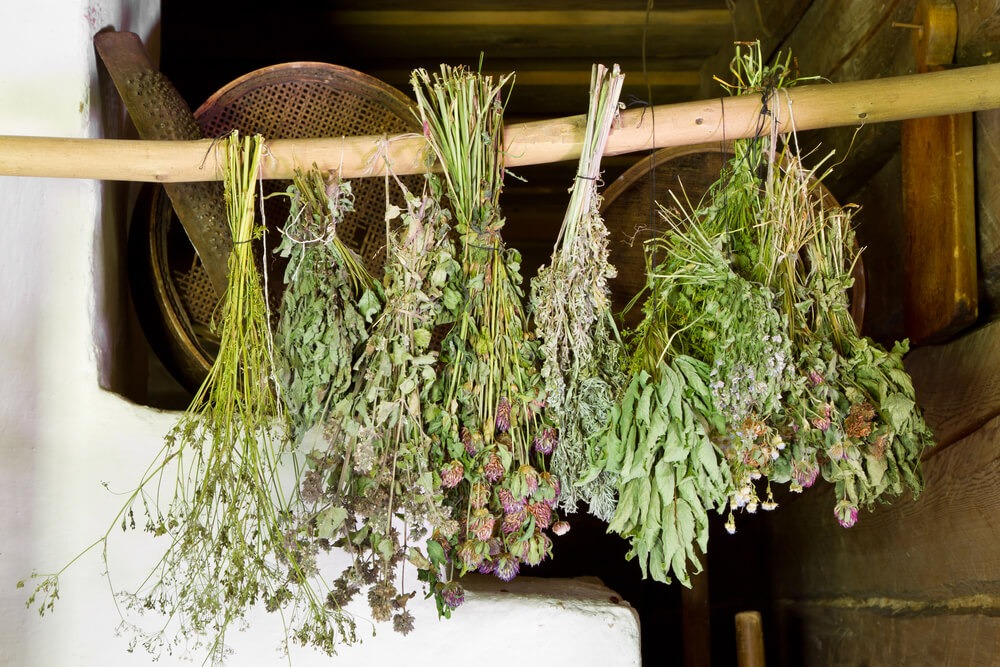
Channel your inner herbalist and hang small herb bundles upside down in a warm, dark, dry location with good airflow. This time-tested method works like magic for sturdy and woody herbs, like thyme, oregano, rosemary, and sage. Why does this method work so well? The slow moisture removal concentrates the essential oils without destroying them.
Essential Steps:
- Bundle small: Tie 6 to 8 stems together with a string. Thick bundles trap moisture and mold.
- Hang in the dark: Find a warm, dry spot with good airflow but no direct sunlight.
- Wait 1 to 2 weeks: Test by crumbling a leaf. It should break easily and have a strong smell.
Your dried herbs should crumble easily and retain their potency when done. Store them in airtight jars away from light. They’ll keep their flavor for up to a year. (Don’t forget to label them! Once your herbs dry, they are surprisingly hard to identify.)
2. Oven Drying – For The Impatient Gardener
Grab your favorite cookie sheet or baking sheet, along with some parchment paper. Spread the herbs on the sheet in a thin layer. Then, place them in the oven on the lowest possible setting (ideally below 170°F). Leave the oven door open slightly to help some heat escape. Check them every 20 minutes! They should be dry and crumbly in 1 to 2 hours. (Some herbs take longer than others, depending on moisture content.)
Essential Steps:
- Go low and slow: Set oven to 170°F (or lowest setting) and crack the door open.
- Single layer only: Spread the herbs on parchment-lined baking sheets. Make sure they don’t overlap.
- Check every 20 minutes: Herbs are done when they crumble but aren’t brown or brittle.
This speedy method works beautifully for rosemary, parsley, or mint. The best part? You’ll have dried herbs ready for tonight’s dinner instead of next month’s meal prep.
Read More – 30 Delicious, Gorgeous, And Beneficial Plants That Grow In The Shade!
3. Freezing Whole Leaves – The Lazy Genius Approach
Sometimes, the simplest methods are the most effective. Wash, dry, and spread your whole herb leaves on a tray to freeze individually. (This prevents them from clumping into a green hockey puck.) Once solid, transfer them to freezer bags. This method is a game-changer for tender herbs like basil, cilantro, and parsley, which can get bitter when dehydrated.
Essential Steps:
- Wash and dry thoroughly: Pat the leaves completely dry with paper towels (water crystals can cause freezer burn).
- Flash-freeze first: Spread the leaves on a cookie or baking sheet. Freeze your leaves for approximately 1 to 2 hours, or until solid.
- Bag and label: Transfer to freezer bags, remove as much air as possible, and use within 6 months.
Yes, your herb leaves will be slightly soft when thawed. However, their flavor remains bright and punchy! They’re ideal for cooking when preserved this way, even if they’re not picture-perfect garnishes.
4. Herb Ice Cubes – Tiny Flavor Bombs
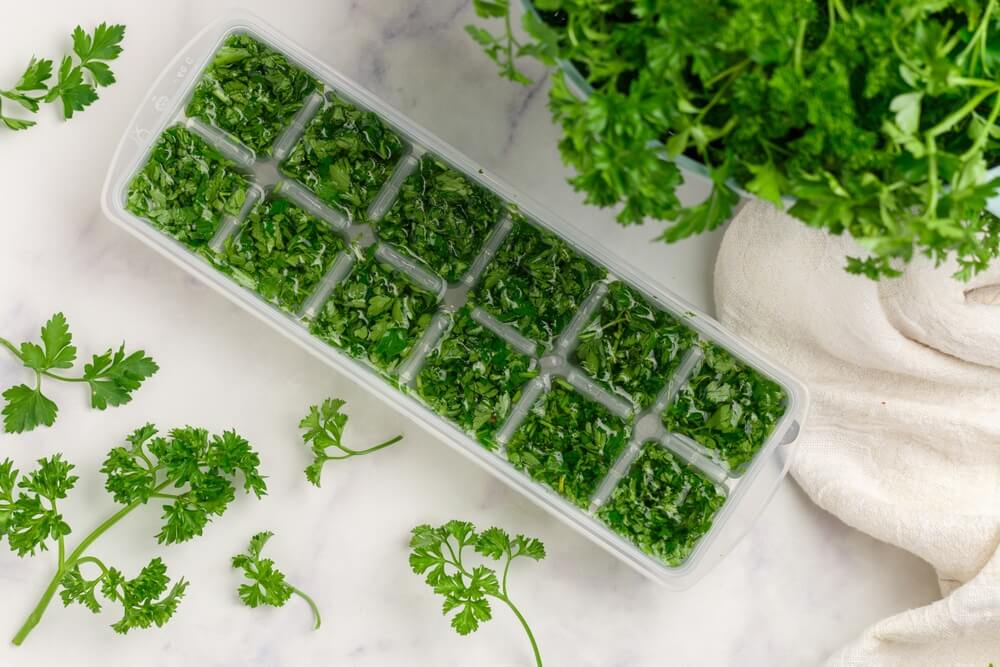
These little cubes are like having a personal sous chef who pre-portioned your herbs for you. Chop fresh herbs and mix them with water or olive oil in ice cube trays. Freeze, then transfer to sealed containers. Each cube is a perfect single-serving of herb goodness that you can quickly and easily toss directly into soups, sauces, or sautés.
Essential Steps:
- Chop and fill: Pack chopped herbs into ice cube trays, then fill them 2/3 full with water or oil. (Herbs may float when freezing! So, optionally, freeze halfway, then top off.)
- Freeze solid: Leave in trays for 4 to 6 hours until completely frozen.
- Pop and store: Remove the cubes from the tray, then store them in labeled freezer bags for up to 8 months.
Chives, dill, basil, and mixed herb blends work fantastically. Your future self, rushing to make dinner, will send you a silent thank-you!
Read More – 17 Best Herbs For Growing Indoors – Even During The Middle Of Winter!
5. Herb-Infused Salts – The Flavor Amplifier
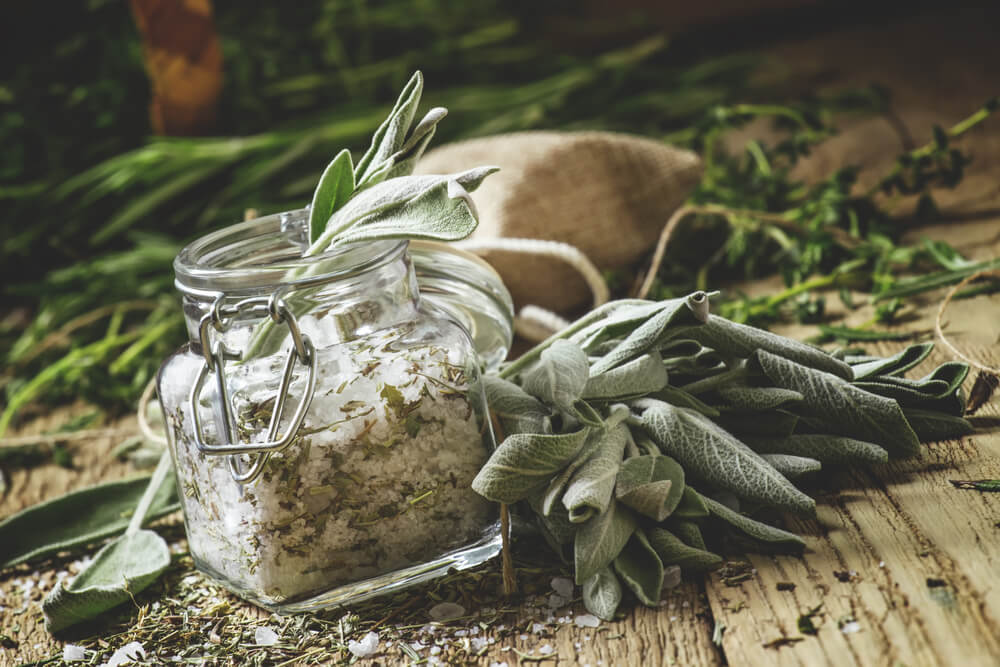
This method is pure alchemy. Combine finely chopped fresh herbs with coarse salt, and let the mixture air-dry thoroughly before storing. The salt works double duty! It preserves your herbs and soaks up their aromatic oils like a sponge.
Essential Steps:
- Use a 4:1 ratio: Combine four parts coarse salt with 1 part finely chopped fresh herbs.
- Spread and dry: Spread the mixture evenly on parchment paper in a dry, well-ventilated area. Stir occasionally and dry for 2-3 days.
- Store airtight: Keep in sealed jars away from moisture. They stay fresh for up to 1 year.
Rosemary salt on roasted potatoes? Chef’s kiss. Sage salt on pork chops? Divine. The result is a gourmet finishing salt that transforms ordinary dishes into something special.
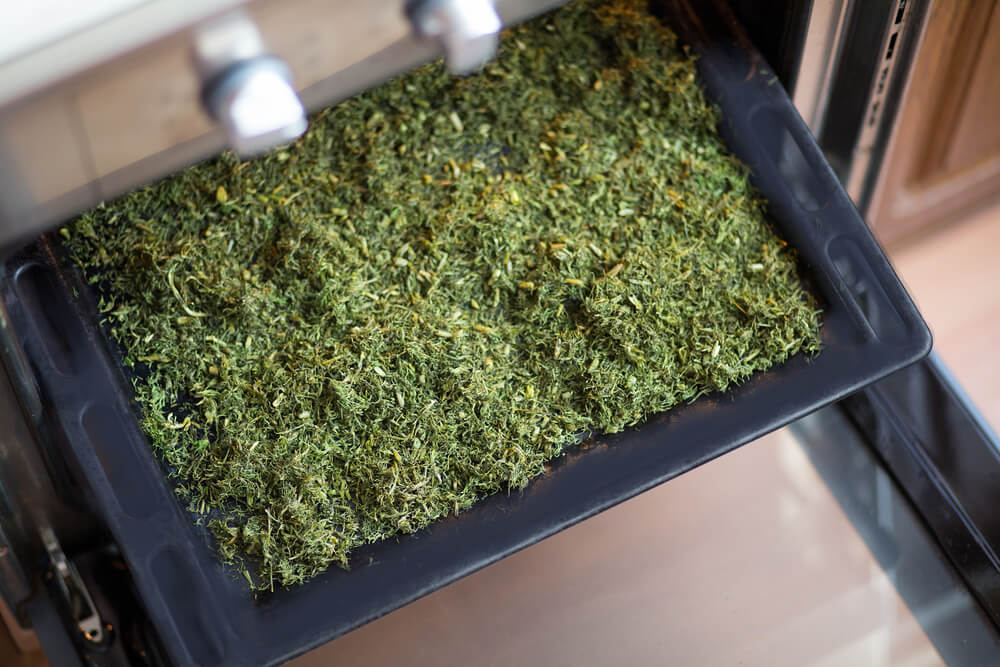
6. Dehydrator Drying – The Consistent Perfectionist

If you own a dehydrator, you’ve got the Rolls-Royce of herb preservation. This method delivers even, predictable results and preserves vibrant color, bold flavor, and nutrients with minimal effort. Most herbs dry in 1 to 4 hours at low temperatures. The resulting herbs also look almost fresh and last for months.
Essential Steps:
- Set temperature: Use 95 to 115°F. Higher temperatures destroy the herb’s essential oils.
- Arrange properly: Place a single layer on trays and avoid overcrowding for even airflow.
- Check hourly: Tender herbs (such as basil) dry in 1 to 2 hours, while woody herbs (like rosemary) require 3 to 4 hours.
With a dehydrator, you’re no longer at the mercy of weather or time. You receive perfectly preserved herbs in every single batch.
Read More – 17 Best Herbs And Flowers To Grow For Making Homemade Tea!
7. Pesto & Herb Pastes – The Crowd-Pleaser
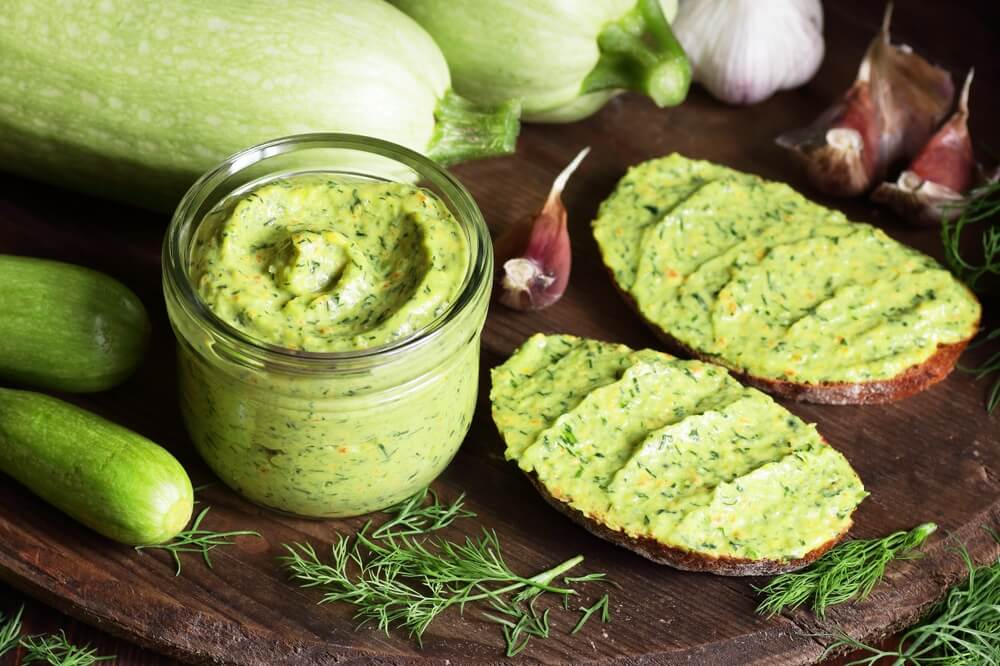
Why settle for plain frozen herbs when you can make flavor-packed pestos and herb pastes? Blend herbs with oil, nuts, and optional cheese or garlic to create ready-to-use flavor bombs. Portion and freeze in small containers or ice cube trays for easy single-serving access that lasts up to 6 months.
Essential Steps:
- Blend with oil: Use a 3:1 ratio of herbs to oil (prevents freezer burn and oxidation).
- Portion smartly: Freeze in ice cube trays or small containers for single-use portions.
- Press out air: Top with a thin layer of oil or press plastic wrap directly onto the surface before freezing.
This method works brilliantly for basil. But don’t sleep on cilantro chimichurri, parsley pistou, or even carrot top pesto. Yes, those feathery carrot greens are edible gold!
8. Vinegar Infusions – The Gourmet Touch

Transform ordinary vinegar into liquid gold by steeping clean, fresh herbs in high-quality vinegar for 2 to 4 weeks. (White wine or apple cider works.) Store in a cool, dark place. The vinegar’s acid content serves as a natural preservative. It extracts herb essences while keeping everything safe to eat.
Essential Steps:
- Use quality vinegar: Choose 5% acidity vinegar, and pack clean herbs loosely in sterilized jars.
- Steep patiently: Let sit in a cool, dark place for 2 to 4 weeks, shaking occasionally.
- Strain and store: Remove all plant material, store in dark bottles for up to 1 year.
Try tarragon vinegar for sophisticated salad dressings, or basil vinegar for marinades that’ll make your neighbors wonder what smells so incredible.
Read More – 18 Lovely Herbs With Stunning, Beautiful, And Vibrant Yellow Flowers!
9. Herb-Infused Oils – The Luxurious Risk-Taker
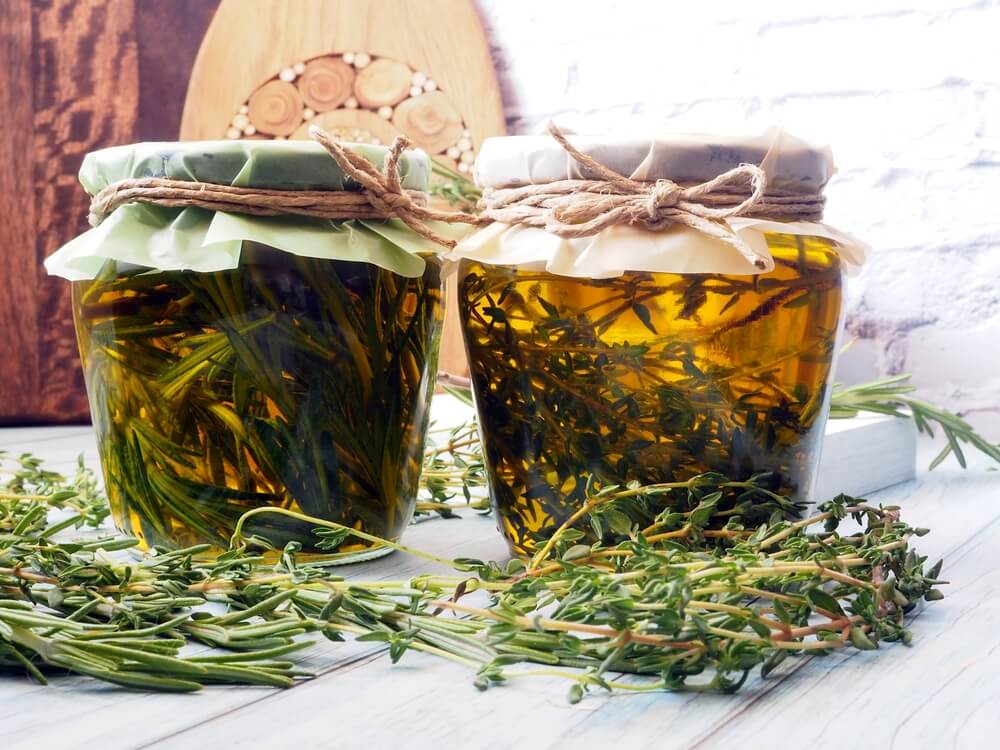
This method yields some of the most delicious flavor infusions imaginable. But it comes with a serious safety note: never store herb oils at room temperature! Fresh herbs + oil + no oxygen = perfect conditions for botulism, which is a real risk in home kitchens. Combine herbs with oil and either refrigerate immediately (use within 4 days) or freeze in small portions.
Essential Steps:
- Use 100% dry herbs: Any moisture creates a risk of botulism. Pat herbs bone dry or use dried herbs (Dry herbs reduce but don’t eliminate risk).
- Combine and chill: Mix herbs with oil, refrigerate immediately (use within 4 days).
- For extended storage: Freeze in ice cube trays. Then transfer to the freezer where you can store them for 3-6 months.
- Critical safety rule: Discard any herb oil left at room temperature for more than 2 hours.
When done safely, this method preserves flavor beautifully. Think vibrant basil oil for drizzling, aromatic rosemary oil for bread dipping, or garlic-herb oil for everything else. The key is respecting the science: low acid + room temperature = danger zone.
Conclusion

Your herb garden worked hard for you. Now return the favor. Pick your favorite preservation method (or try them all!), and transform your summer harvest into a year-round flavor arsenal. Future you will thank present you every time you reach for that jar of homemade herb salt or pop a basil ice cube into your winter soup. Happy preserving!
What about you?
- Will you preserve leftover herbs this year?
- Which preservation method will you use?
- Do you know of any other reliable methods for preserving herbs?
Thanks for reading.
Have a great day!


